How to Change a WordPress Favicon: A Complete Guide
Your website’s favicon is the small icon that appears on the browser tab when someone visits your site. It’s a small but important element that helps with brand recognition and improves the user experience by making it easier for visitors to identify and locate your website among multiple open tabs. If you want to personalize your WordPress site, knowing how to change your WordPress favicon is a must.
In this guide, we’ll walk you through several ways to change or update the favicon on your WordPress site, ensuring your site looks professional and consistent across all platforms and devices.
What is a Favicon?
A favicon (short for “favorite icon”) is a small graphic that represents a website. It typically appears in browser tabs, bookmarks, and the address bar next to the site’s URL. Favicons are usually 16×16 pixels in size, though modern browsers may display larger versions depending on the context.
While it’s a minor design element, a well-chosen favicon can reinforce brand identity, especially for businesses. It helps users quickly recognize your site among others, enhancing brand recognition and user experience.
How to Change WordPress Favicon
Changing your WordPress favicon is easier than you might think. Depending on your theme, you can use WordPress’s built-in options, theme settings, or a plugin to change the favicon.
Here’s a step-by-step guide on how to change your WordPress favicon.
Method 1: Change Favicon Using WordPress Customizer (Built-in Option)
The easiest way to change the favicon on your WordPress site is through the WordPress Customizer, a feature built into WordPress that allows you to manage various aspects of your website’s appearance.
Here’s how to do it:
Step-by-Step Instructions:
- Log in to Your WordPress Dashboard
Start by logging into your WordPress admin dashboard. - Navigate to the Customizer
From your WordPress dashboard, go to Appearance > Customize. - Select Site Identity
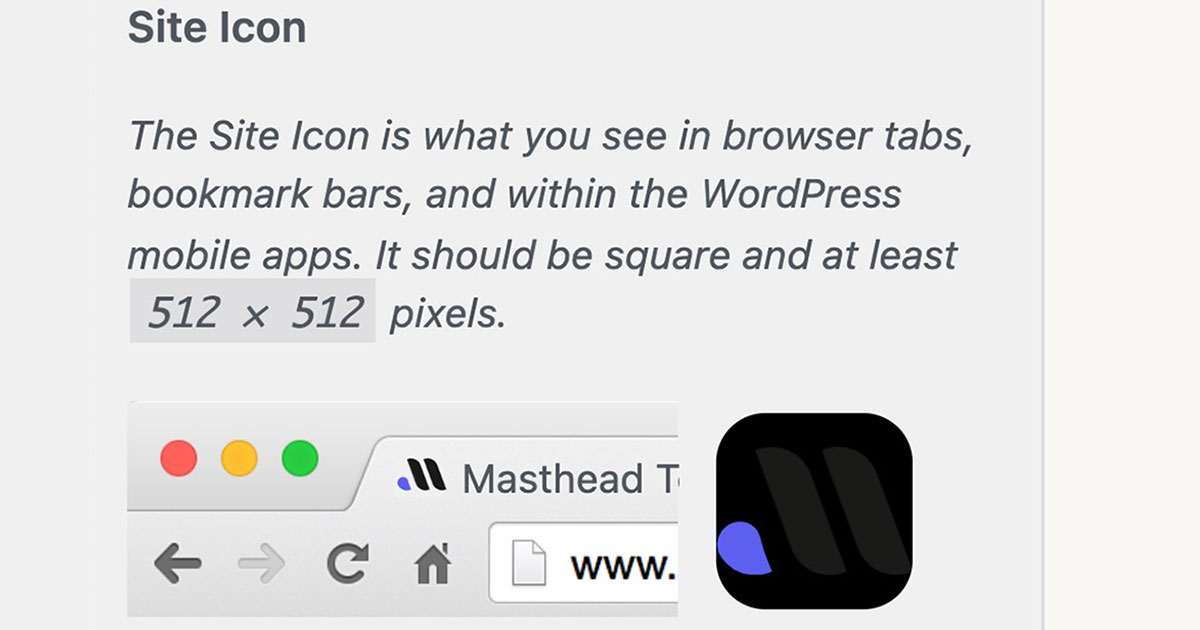
In the Customizer, find and click on the Site Identity section. - Upload a Favicon
Look for the section labeled Site Icon. Click Select Site Icon and upload your favicon. WordPress recommends that your favicon image should be at least 512×512 pixels for the best results, although it will display smaller versions on the site. - Publish Your Changes
Once you’ve uploaded and cropped the image (if necessary), click Publish to save your changes. Your favicon should now appear in browser tabs and bookmarks.
Method 2: Change Favicon Through Theme Settings
Some WordPress themes come with built-in options for changing the favicon. If your theme includes such settings, you can change the favicon directly through the theme options.
Step-by-Step Instructions:
- Access Theme Settings
Log in to your WordPress dashboard and navigate to Appearance > Theme Options (or a similarly named section, depending on your theme). - Look for Favicon Settings
Explore the theme options to find a section dedicated to favicon or site icon settings. This might be under “General Settings” or a specific “Branding” tab, depending on the theme. - Upload Your Favicon
Once you find the option to change the favicon, upload the new icon from your media library or your computer. - Save Changes
After uploading the image, save your changes and check your site. The favicon should now be updated.
Method 3: Use a Plugin to Change WordPress Favicon
If you’re using an older theme that doesn’t support the built-in WordPress favicon feature, or if you prefer using a plugin, there are several plugins available that allow you to easily change your WordPress favicon.
One popular option is Favicon by RealFaviconGenerator.
Step-by-Step Instructions:
- Install the Plugin
In your WordPress dashboard, go to Plugins > Add New, search for Favicon by RealFaviconGenerator, and click Install Now. Once installed, activate the plugin. - Go to the Favicon Settings
After activation, you’ll see a new option under Appearance > Favicon. - Generate Your Favicon
Upload your favicon image (at least 260×260 pixels for best results) and customize how it will look across different devices and browsers. - Publish Your Favicon
Click Generate Favicon to apply it to your site. The plugin will take care of generating the correct sizes for different devices and browsers, ensuring a consistent experience.
Method 4: Manually Add a Favicon to Your WordPress Site
For advanced users, you can manually upload and add a favicon by editing your theme’s header.php file. This method is more complex and should only be used if you are comfortable working with code.
Step-by-Step Instructions:
- Create Your Favicon
Create your favicon and ensure that it is saved in .ico format (or use PNG for higher-quality results). The recommended dimensions are 16×16 or 32×32 pixels. - Upload the Favicon
Use an FTP client (such as FileZilla) or your web hosting file manager to upload your favicon file to the root directory of your WordPress installation (public_html or www folder). - Edit the header.php File
Log in to your WordPress dashboard, go to Appearance > Theme Editor, and select header.php from the list of theme files. - Add Favicon Code
In the<head>section of the header.php file, add the following line of code:
<link rel="icon" href="https://yourwebsite.com/favicon.ico" type="image/x-icon" />
Replace “https://yourwebsite.com/favicon.ico” with the correct URL of the uploaded favicon file.
- Save Your Changes
Save the changes to the header.php file. The favicon should now appear on your website.
Best Practices for WordPress Favicons
- Use the Right Size: While favicons are displayed as 16×16 pixels in browser tabs, WordPress recommends using a 512×512 pixel image to ensure that your favicon is crisp and clear on all devices.
- Keep It Simple: Since favicons are small, a clean and simple design works best. Avoid using too many intricate details that won’t be visible at such a small size.
- Use Transparent Backgrounds: If your favicon contains a logo or symbol, use a transparent background (PNG format) to ensure it looks professional on different browsers and devices.
- Test Across Browsers: Once you’ve uploaded your favicon, test it on different browsers and devices to make sure it displays correctly.
Conclusion
A favicon might be a small element of your website, but it plays an important role in enhancing your brand’s identity and improving user experience. With WordPress, changing or adding a favicon is straightforward, whether you use the built-in Customizer, your theme settings, a plugin, or a manual method.
Now that you know how to change your WordPress favicon, you can easily update your site’s look, reinforce your brand, and provide a more professional experience for your visitors. Need help with customizing your WordPress site? Contact Masthead Technology for expert WordPress design and development services.
FAQs
1. What size should my favicon be for WordPress?
WordPress recommends uploading a favicon that’s at least 512×512 pixels for the best results, but it will be displayed at 16×16 pixels in browser tabs.
2. Can I use any image format for my favicon?
Yes, WordPress accepts a range of image formats, including .png, .jpeg, and .ico, but .png with a transparent background is recommended for a clean look.
3. What if my WordPress theme doesn’t support favicons?
If your theme doesn’t offer a favicon option, you can use a plugin like Favicon by RealFaviconGenerator, or manually add it by editing the header.php file.
4. How do I check if my favicon is working?
After uploading your favicon, visit your website in a browser and look at the tab where your site is open. You should see your new favicon displayed there. If you don’t see it immediately, try clearing your browser cache.
5. Can I change my favicon in the future?
Yes, you can easily change your favicon at any time by repeating the steps outlined above, using the WordPress Customizer, your theme settings, or a plugin.